Laboratory Safety
Objectives
- Explain the general procedures for safely working in the lab.
- Recognize safety issues in the laboratory.
- Apply safety protocols in a laboratory setting.
- Explain the proper use and handling of chemicals in the laboratory.
- Identify the location and correct use of laboratory safety equipment.
- Identify different types of laboratory equipment and explain their proper use.
- Explain the use of SDS sheets, the NFPA Fire Diamond, and GHS as they apply to chemical safety.
- Interpret the information found on SDS sheets, NFPA Fire Diamond, and GHS to safely operate in the laboratory.
Introduction
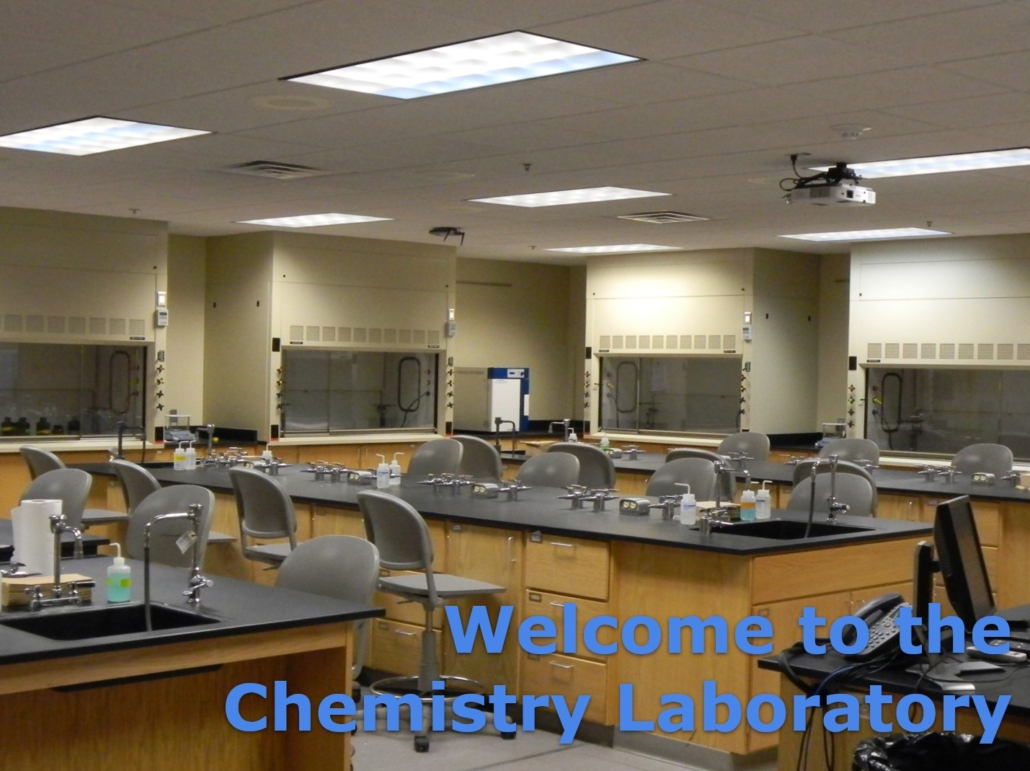
While you will not complete the experiments in a chemistry laboratory, the same rules apply to your at home laboratory. The experiments you will complete in this course will be conducted in your kitchen. Throughout this course, whenever you see the word “laboratory,” I am really referring to your kitchen. The kitchen is really the chemistry laboratory of every home. There is a lot of chemistry that occurs every time a meal is cooked or a cake is baked. We will be investigating the chemistry in your house throughout this course to learn and apply chemical concepts. However, before we can begin this study, we must learn how to operate safely in the laboratory.
Laboratory safety is important to everyone and should be first and foremost on the mind of anyone working in a lab. Laboratory accidents are common, can happen at any time, and may result in serious injuries. Common laboratory accidents include cuts, burns, coming into direct contact with corrosive or toxic chemicals, and inhalation of dangerous fumes. The occurrence of these types of injuries can be minimized by following procedures which help create a safe environment for learning.
The responsibility for safe working conditions rests with everyone. Remember, the main purpose of the laboratory is to allow students to get hands-on experience applying the concepts covered in lecture. Working in the laboratory should be fun and safe for all involved.
There are three general hazard areas that the safety procedures outlined in this activity will address:
- Chemical
- Equipment
- Slips, Trips, and Falls
Proper attire in the laboratory will also be discussed as applied to this course.
You are expected to learn and abide by the guidelines and general safety information discussed in this laboratory activity. Each laboratory experiment you complete will also include information on any specific safety hazards to be aware of while completing the activity. Be sure to follow all of the guidelines outlined in each activity and any specific hazards noted in each experiment.
Please be sure to sign and return the Safety Contract, linked in the Laboratory Safety Contract Assignment folder in Module 1 of Brightspace. Students will not be allowed to participate in future laboratory activities until this contract has been signed and submitted to the assignment folder provided on Brightspace. THIS MUST BE COMPLETED BY THE END OF MODULE 1. Failure to do so could result in being removed from the course or failing the class.
General Safety Rules
To do your part to maintain safe working conditions, you must obey the safety regulations discussed in this section and report any violations of these regulations to your instructor. Failure to follow the rules of the laboratory as outlined here can result in serious injury to the student. Since you are conducting these experiments at home and not in a laboratory on the Riverland campus, YOU are responsible for your own safety.
General Laboratory Safety Rules
1. Read ALL of the experimental procedure before beginning work on the week’s experiment. Ask your instructor for clarification on any portions of the experiment you are unclear on before beginning work.
2. Gather all of the chemicals and equipment you need to perform an experiment before you begin the experiment. Refrain from touching other materials except those you are using in your experiment.
3. Do not allow family members or pets to be in your laboratory area while you are completing an experiment. It is recommended you close the door to your laboratory (if possible) and post a sign when experiments are in progress to warn others.
4. Students under the age of 18 must complete all experiments under the supervision of a parent or legal guardian. The guardian or adult should read these safety rules and the experiment before assisting the student. Parents/legal guardians should also wear safety goggles, nitrile gloves, and appropriate clothing while supervising the experiment. The parent/legal guardian must also sign the safety contract before the student can complete any experiments in this class.
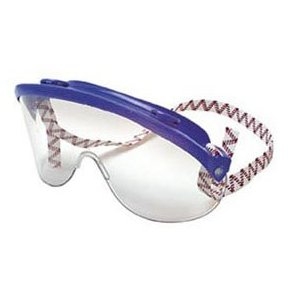
5. Chemical Safety goggles must be worn at all times. These goggles can be obtained from the bookstore or Amazon (Figure 1). These are designed to protect your eyes while completing the experiments in this course.
6. Dress appropriately. Open-toed shoes, mules, and sandals are not acceptable in the laboratory. Examples of inappropriate footwear are included in Video 1. Clothing should cover the student from the neck to the knee. Please roll up/tie back any loose sleeves or long hair and remove any scarves or long necklaces before beginning any experiment. Improper dress poses a safety hazard and should be corrected before
7. Do not eat or drink anything while performing the experiments in this course. Please note: gum is considered a food.
8. Heat only heat-resistant glassware. Only glassware marked Kimax or Pyrex can be heated.
9. When heating a solution, do not point the container at yourself or someone else as chemicals can splash or boil out of the container.
Figure 1 (above) – Visorgogs available through Amazon.
Video 1 (below) – Video demonstrating unacceptable footwear for the laboratory.
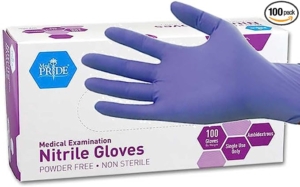
Figure 2 – Nitrile gloves (click here to order through Amazon). These gloves do not contain latex and are hypoallergenic. They protect your skin from chemical exposure.
10. All students should wear disposable nitrile gloves while completing the experiments in this course (See Figure 2). These can be found in the medication section of most stores or ordered from Amazon. Replace a glove when one breaks/tears. A new pair of gloves should be used for each experiment and then disposed of after completion. Students can also wear aprons while completing laboratory experiments; however, they are unnecessary as the splash risk for these experiments has been assessed as low.
11. Please properly clean and store all glassware and other laboratory equipment and wipe down your laboratory station after completing the experiment. This will help prevent cross-contamination with other areas of your kitchen.
10. All students should wear disposable nitrile gloves while completing the experiments in this course (See Figure 3). These can be found in the medication section of most stores or ordered from Amazon. Replace a glove when one breaks/tears. A new pair of gloves should be used for each experiment and then disposed of after completion. Students can also wear aprons while completing laboratory experiments; however, they are unnecessary as the splash risk for these experiments has been assessed as low.
11. Please properly clean and store all glassware and other laboratory equipment and wipe down your laboratory station after completing the experiment. This will help prevent cross-contamination with other areas of your kitchen.
12. Cover your laboratory workspace with a large garbage bag and secure the edges with tape before beginning any experiment. Complete all experiments on the garbage bag and dispose of the garbage bag when the experiment is done. Wipe down the counter/table top under and around the garbage bag after it has been disposed of.
13. Clean up any messes you make immediately. This includes any chemicals that are spilled at the digital balance, no matter how small.
14. Clean spills from the outside in. Apply paper towels over the spill, then, carefully wipe in starting from the outside. It is recommended you keep paper towels or other rags available in case of a spill to clean it up quickly.
15. Wash hands with soap and water before leaving the laboratory. Refrain from touching your face during lab or other kitchen equipment not being used during the experiment while completing the activity.
16. If a chemical splashes on your arms, wash the affected area immediately with soap and water. If chemical splashes onto larger portions of your body (torso, down legs, etc) wash the chemical off in the shower. Seek medical attention if skin irritation or other discomfort occurs. Be sure to review the Safety Data Sheet for the chemical you were exposed to and follow any other guidelines for treatment outlined. Safety Data Sheets are discussed later in this activity.
17. Each laboratory will take approximately 1-2 hours to complete once all of the chemicals and equipment have been collected. Allow enough time to complete all experiments in one block of time without interruption. Do not leave any experiments unattended.
18. Perform only the experiment as outlined in the laboratory manual and follow any instructions your instructor provides in the pre-lab lecture/introduction closely. Deviating from the published experiment can result in an accident. Unauthorized experiments are prohibited.
19. Do not return unused chemicals to the reagent jar. This can cause contamination. Dispose of any unused chemicals as outlined in the experimental procedure.
20. Hot glass looks the same as cool glass. Allow time for hot glass to cool. Use proper tools (tongs, pot holder, test tube holder, etc.) when handling hot glass.
21. Do not place broken glass in the trash. All broken glass should be properly cleaned up immediately and placed in a paper grocery bag. Fold the top of the grocery bag over several times and tape the bag shut with packing tape before placing it in an outside trash receptacle (dumpster or otherwise).
22. Always add the acid to water when diluting an acid. Adding the water to an acid can cause the solution to splash out of the container and onto your skin/clothes.
23. Never heat a liquid in a closed container. The expanding gases may cause the container to explode.
24. Never stick your nose into a container to smell it. If an experiment directs you to record information regarding odor, use your hand to waft the odor towards your nose carefully. Watch Video 2.0 for more information on how to waft.
25. Students should follow all of the manufacturer’s recommended use for the equipment in their kitchen while completing these experiments.
26. Keep a first aid kit on hand to treat minor injuries, such as scraps, cuts or minor burns, quickly.
Video 3.0 provides additional laboratory safety information. Please watch this video before proceeding with this lesson.
Video 2 – How to waft. (1)
Video 3 – Laboratory Safety (2)
Equipment Safety
Know your laboratory equipment and its proper use. You will become familiar with the proper use of this equipment throughout this course.
A list of laboratory equipment you will need for this course has been provided in Module 1. This equipment can be ordered from Amazon or obtained from the Riverland Bookstore. Review this list to become familiar with this equipment and their use. Instructions for this are also included in that document and in the syllabus for this course. You are responsible for obtaining these materials and learning their proper use in this course.
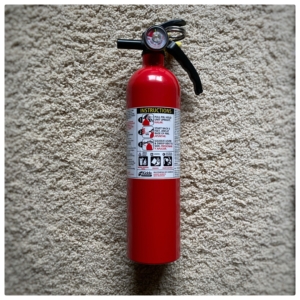
You are required to have a class ABC fire extinguisher (Figure 3) in your laboratory while performing all experiments.
To use the extinguisher, remember the acronym P.A.S.S: (3)
Pull the pin
Aim the fire extinguisher at the base of the fire.
Squeeze the handle of the extinguisher to discharge the contents of the extinguisher.
Sweep the extinguisher back and forth at the base of the fire.
Video 4 demonstrates how to operate a fire extinguisher using the P.A.S.S. method.
You also need to complete a list of emergency numbers and place it by the phone so they can be accessed quickly in case of an accident. These should include poison control, fire, and ambulance.
Figure 3 (above) – An ABC Fire Extinguisher.
Video 4 (below) – How to operate a fire extinguisher using P.A.S.S. (3)
Basic rules for using laboratory equipment
- Use laboratory equipment only for its intended use. Follow all manufacturer guidelines for using electrical or gas-powered equipment.
- Know the proper use of the equipment in the laboratory. Learning the identity and proper use of this equipment will help ensure a safe laboratory class for you. An equipment list with a description of the proper use of each is included in Appendix A of this lab manual.
- Do not use any damaged or malfunctioning equipment in the laboratory. This equipment should not be used and should be repaired or removed from the laboratory.
- Electrical cords should be kept dry and not have any exposed wires. Keep electrical cords away from hot surfaces to prevent damage to the cords.
- Never use chipped or cracked glassware in an experiment. If you discover any chipped or broken glassware, dispose of it in a paper grocery bag as described above.
The brain is the most valuable piece of safety equipment. Familiarize yourself with the lab and be aware of everything you do while completing the experiment. Thinking first and acting second will prevent most accidents in the lab. It is your responsibility to THINK SAFETY!
Slips, Trips, and Falls
A slip, trip, or fall can occur at any time in the laboratory. Below are a few guidelines to minimize any accidents due to slips, trips, and falls.
- Do not place books, coats, or other materials on the floor near your work area. Place these away from the area you are working.
- Make sure all area rugs have slip prevention between the rug and the hard floor beneath. If a rug does not have slip protection, it should be moved from the laboratory while experiments are in progress.
- Be sure to thoroughly clean up all spills and dry the surface to prevent students from slipping and falling.
- Be careful and aware of your surroundings when working and moving through the lab. This can help prevent accidents from occurring.
- No horseplay is allowed in the laboratory.
- Keep pets, children, and other family members out of the laboratory while you are working. It is recommended that you put up a sign letting these people know that you are working and to stay out of this area.
Chemical Safety
We will be using a wide variety of chemicals in this course, some of which are strong acids/bases, oxidizing agents, or teratogens (a chemical that is harmful to developing fetuses). You need to know the specific hazards of each chemical used in a lab so you know how to properly handle the chemicals. Safety Data Sheets (SDS), the National Fire Protection Association (NFPA) Fire Diamond, and the Globally Harmonized System (GHS) provide information regarding hazards and proper handling of chemicals.
Safety Data Sheets (SDS)
A Safety Data Sheet (formerly known as a Material Safety Data Sheet) is designed to provide the proper procedures for handling or working with a particular substance. SDSs include information such as physical data (melting point, boiling point, flash point etc.), toxicity, health effects, first aid, reactivity, storage, disposal, protective equipment, and spill/leak procedures. These are of particular use if a chemical spill or other accident occurs. The formats of SDSs tend to vary, but they usually convey the same basic types of information.
SDS sheets can be found online by searching for the name of the chemical desired and the term “SDS.” For instance, to find an SDS sheet for sulfuric acid, a student would want to search for “sulfuric acid SDS” using a web search engine.
Video 5 provides additional information on how to use an SDS.
Video 5 – Understanding an SDS. (4)
The National Fire Protection Association (NFPA) Fire Diamond
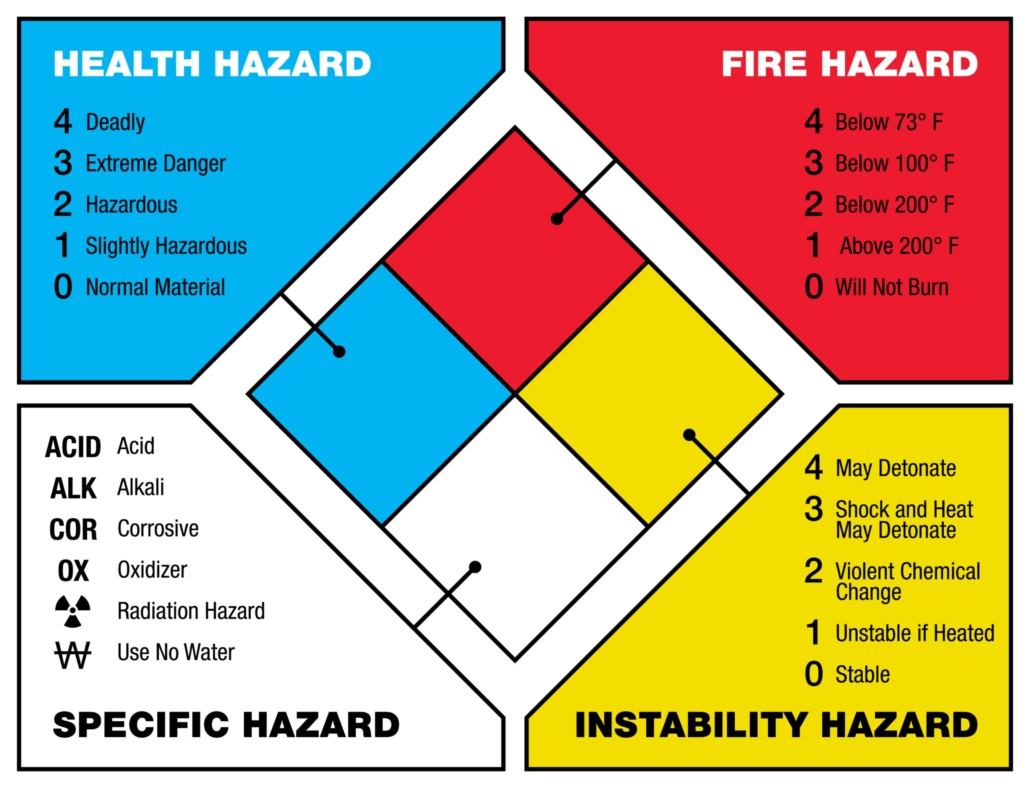
The most important information that can be obtained from the SDS is translated into a quick visual representation of the chemical hazard for that substance. The diamond is divided into four quadrants: health (blue), flammability (red), reactivity (yellow), and Special Hazards. Figure 4 illustrates the general layout of the fire diamond. The fire diamond is often displayed on the side of chemical containers or buildings to communicate important information about the chemical(s) to those who might come in contact with it.
The health, flammability, and reactivity sections will contain a number from 0 to 4, noting the severity of the hazard for that chemical. The higher the number, the greater the hazard severity. If no number is indicated, it is assumed the chemical does not have a significant hazard for that area.
The white special hazard section of the fire diamond indicates specific properties the chemical has, such as being radioactive or a strong oxidizer.
Video 6 demonstrates how to interpret and understand the Fire Diamond.
Figure 4 – NFPA Fire Diamond. (5)
Video 6 – How to Interpret the NFPA Fire Diamond. (6)
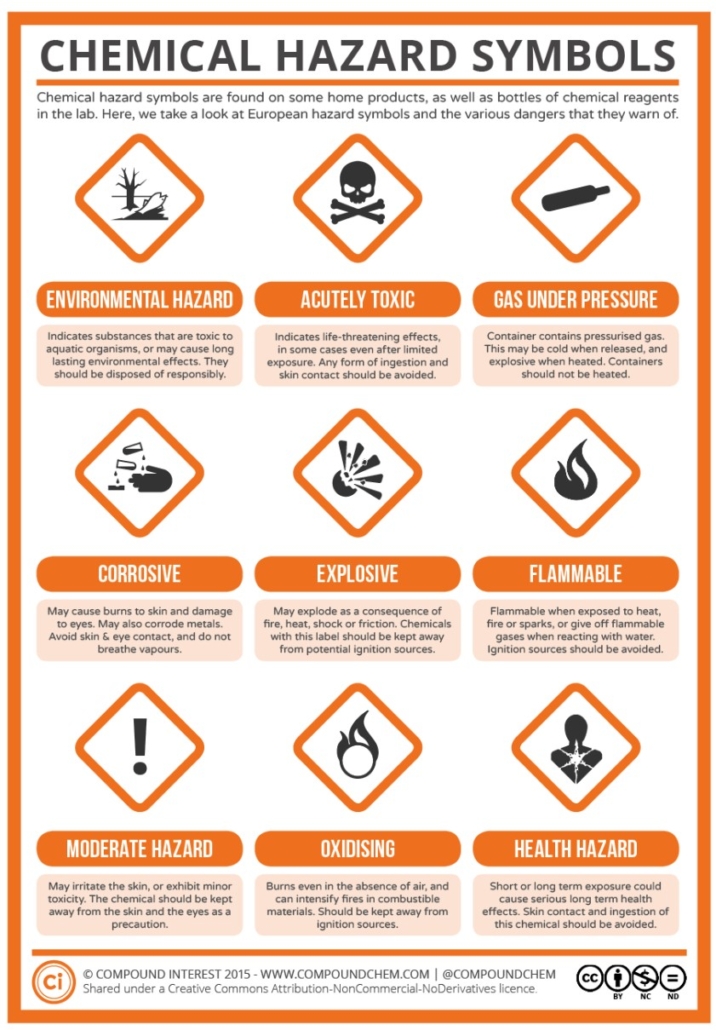
Figure 5 – GHS Pictograms. (7)
The Global Harmonized System (GHS)
This system of graphic notation resembles the NFPA fire diamond; however, additional information is provided on the chemical label, pictograms are used to identify key hazards (Figure 5), and the number system regarding health, reactivity, and flammability is opposite of that for the NFPA fire diamond. The GHS rating system goes from 1 to 5. Anything rated a 1 on this scale is very dangerous while a 5 rating means there is little hazard threat.
Video 6 provides additional information on how to use and interpret the GHS.
GHS was created to standardize chemical safety warnings worldwide. While this system is being adapted in the US, NFPA and GHS labels may be used on chemical containers. It is important to establish which type of labeling system is being used before interpreting the information provided.
Video 7 – How to Interpret the GHS. (8)
Assignment
Now that you know how to work safely in a laboratory, please complete the following tasks:
- Review the list of laboratory equipment and their uses provided with the course text/materials listed on Brightspace.
- Order the necessary items from Amazon or the Riverland Bookstore. You will need to have received these items by the start of Module 3, so order them right away.
- Complete the laboratory safety quiz located on Brightspace.
- Read, complete, sign, and submit the safety contract to the Laboratory Safety Contract assignment folder on Brightspace. This contract is provided in the associated assignment folder. You must download the file, complete and save it to your computer, and submit it to the assignment folder.
You will not be allowed to complete any future laboratory experiments in this course until all of the tasks listed above have been completed.
References
(1) Chem101bsu. How to Waft Vapors [Video]. YouTube, August 2, 2014. https://youtu.be/sOxN60sl6D8 (accessed June 6, 2023).
(2) Lincoln Learning Solutions. Lab Safety [Video]. YouTube, July 24, 2017. https://youtu.be/gT9QZkbB9k4 (accessed June 13, 2023).
(3) Howcast. How to use a Fire Extinguisher [Video]. YouTube, May 21, 2010. https://youtu.be/lUojO1HvC8c (accessed June 6, 2023).
(4) Mobley, S. Understanding a Safety Data Sheet (SDS) [Video]. March 23, 2018. https://www.youtube.com/watch?v=-LwcTUn90zI (accessed June 6, 2023).
(5) Jones, Tony. How to Read an NFPA Fire Diamond. https://www.building-maps.com/how-to-read-an-nfpa-fire-diamond/ (accessed June 13, 2023).
(6) Rogers, C. Firefigher Explains NFPA 704 [Video]. YouTube, March 2, 2022. https://youtu.be/VCCBasj0ZgU (accessed June 6, 2023).
(7) Compound Interest, Chemical Hazard Symbols. Compound Interest. https://www.compoundchem.com/2015/05/19/hazard-symbols/ (June 13, 2023). Creative Commons Attribution-NonCommercial-NoDerivatives 4.0 International License.
(8) Grainger. What is the Globally Harmonized System (GHS)? [Video]. YouTube, October 21, 2013. https://youtu.be/NnZQY_rXg5w (accessed June 6, 2023).
This page was created on June 16, 2023, and was last updated on February 9, 2026.
© Catherine Haslag 2023. All Rights Reserved.
